Tuesday, 28 February 2017

Tuesday Throwdown Challenge!

It is the Tuesday Throwdown Blog Challenge and Your Next Stamp is a sponsor!
The theme of this month is: Things with Wings

I created a card using an adorable stamp set called Fairy Wings and the matching dies, as well as Happy Everything! (and the Happy Die)
I coloured the little fairy with Copic markers and attached her to the card where I stamped some sentiments and the Happy Die Cut.

All the products used look like this:


 You can find all these in the Your Next Stamp STORE.
Thanks for stopping by!
Sue


Wednesday, 22 February 2017

YNS February Feature Day!


Today is a great day at YNS because it is Feature Day!
We are inspired by anything and everything!
This months theme is MARGARITAS!
DO you think we need a holiday from this cold weather?

For my Feature Day post I used a newly released stamp set called: Smiley Happy Critter Crew Three
to create this fun shaker card!

Here is what these wonderful sets look like!


Go to the YNS Blog, make a comment and you could win a 
stamp set of your choice!
Hope you enjoyed my shaker card and wishing everyone a great week!

Thanks,
Sue

Tuesday, 21 February 2017

YNS Butterfly Box Tutorial


Good Afternoon! In the February release, Your Next Stamp released this beautiful
Butterfly Gift Box Die Set.
It is a perfect little box for gifts, weddings and special favours!

Here is a tutorial of how to put the box together:

For the purpose of the tutorial I used four different colours of cardstock but you would probably use all the same or two colours.
 Start by cutting two pieces of cardstock with the box base die.

 And one of each of the butterflies. (So you have four pieces all together.)
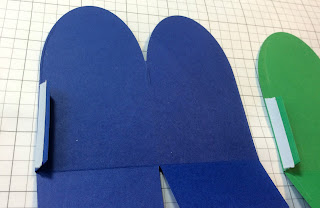
 Crease the folds on the base die so you have two bottom folds and one side fold on each piece of cardstock.
 Adhere strong tape onto the two side flaps.
 Then peel off the tape, stick the two base pieces together and turn over.
Peel the second tape and stick those sides together to form a box shape.

 Fold two of the sides in and place tape onto one of the inner flaps and adhere the bottom together.
 This will form the base and bottom of your box!
 You should have two butterflies.......place them so that the bottom and top slits face each other. (like above).

This will be how you want your butterfly to look at the end.
( So just make sure you have them the right way)
 Put adhesive tape on the outer part of the flaps of the butterflies (both sides).
 Then stick them to the inner part of the base box.
 Fold in the other two flaps....and bring together the two butterflies (along the slits).
The final box should look something like this!
Here is a box using all the same cardstock and patterned papers from YNS!
Thanks for taking the time to read my tutorial!
Have a great day,
Sue

Friday, 17 February 2017

Sketch and Colour Challenge starts!


Welcome to a wonderful Friday at Your Next Stamp!

We have a new Colour and Sketch Challenge starting today and here is my card I
(This is a set that has just been rereleased in Clear!)

We are supposed to get warmer weather this weekend and
Easter is just around the corner so... I thought that this little bunny would be perfect for my card!
This month I just used both the colour and sketches!:
 I used the stamp set called Smiley Happy Critter Crew Three and the Open Scallop Circle dies
  Here is what everything looks like:


 And here are the sketch and colour themes!
  Be sure to join in the fun and share your own creation
inspired by either the sketch or the
colours OR both!
Check out the YNS Blog for all the details and you could win a gift certificate!
Have a wonderful weekend!

Sue

Wednesday, 15 February 2017

Sad Days....

Christmas for my family this year was pretty sad....on the 23rd of December we found out that my cousin passed away suddenly. Having just sat down to dinner with my parents and getting the phone call....... we were all in a state of shock.
At times in the past I have felt that crafting helps me through things, whether it helps for processing or maybe making something for someone makes me feel better. Sympathy cards are hard.

I had ordered this die (for my stocking!) and was waiting for the matching stamp set to come in when I decided to make this card for one of my cherished family members.

This die is a journaling card and is called: Maple Leaves by Neat and Tangled and since December I have purchased the matching stamp set.
I coloured the leaves with Zig Clean Color Markers and used a Sentiment Die from Simon Says Stamp to go with it.
I was pleased with how the card turned out and I hope it brought a
little joy to my family member on such a sad occasion.

Cheers,
Sue


Happy Day!

Today I am showing you a card I created using my Zig Clean Color Markers and
an adorable stamp set from Neat & Tangled.
This set is called Itty Bitty Welcoming Committee and has a cute bunny and lamb as well as a bunch of great sentiments!
I stamped the image using Memento Ink and then coloured it with my Zig Clean Color Markers to give a watercolour effect. Then I used a Gina Marie Die for the border and adhered it to some plaid paper I had in my stash!
Have a wonderful day!
Sue


February Designer Showcase at YNS!

Today is Day Three in our Designer Showcase for February at Your Next Stamp!
We are Showcasing an original rubber stamp that has been redesigned and relaunched in Clear!

I will be using the
to make this cute set of note cards!


I started off by gathering all my supplies: Cardstock, Just For Fun Paper, Black Olive Ink, Smiley Critter Crew stamp set-Three, Watercolour Paper, Water brush and Zig Clean Color Markers.

I cut the cardstock into 3x6 strips, the patterned paper 2 3/4x 2 3/4,
and the watercolour paper into 2 1/4x 2 1/4 squares.

I then stamped the four images into the watercolour paper with the Black Olive Premium Ink. This will allow me to colour the images with my Zig Markers.


I coloured each of the four Critters with Zigs and a Waterbrush.
 I then stamped some of the sentiments and fussy-cut two of the four Critters out.
I attached everything together and
 For the Owl Critter I stamped the sentiment in the inside of the card!

I hope you enjoyed my tutorial and the revamping of the Smiley Happy Critters Crew stamp set!
Karen has even made dies for these stamps now!
Thanks for stopping by!
Sue

Sunday, 12 February 2017

Little Stinker Bookmark

Back before Christmas I was introduced to a fabulous stamp company called Neat and Tangled when I won a gift certificate from the Coffee Loving Blog Hop. Well, I fell in love with the stamps and dies and have managed to start a little collection since then!
For this challenge I used a stamp set called Little Stinker and made a bookmark for my daughters 11th Birthday just this week!
I die cut the tag using Distress watercolour paper and stamped the image with Memento Ink. I then coloured the cute skunk with Zig Clean Color Markers for a watercoloured look and stamped the sentiment with Versafine and my Misti.
Thanks for looking!
Sue

entered: Little Tangles Challenge 77

Wednesday, 8 February 2017

All about Texture this month!

Here at YNS we are challenged each month to create something new using a specific theme!
For the month of FEBRUARY our Design Team Dare is: 
All about TEXTURE!

I fell in love with a new stamp set released in February called:
and I made my card using cute little Phoebe and her glasses!

I used the new papers from the Just For Fun paper pack, an embossed cardstock and a Heat embossed sentiment. I also paper pieced Phoebe's dress and coloured everything with Copic markers.

This is what these new items look like!


Go to the YNS Blog to see what the other Design Team Members have made for you!

Make sure to comment on the YNS Blog because you could win a stamp set of your choice!

All the products used can be found in the YNS Store.

Thank you for looking!
Sue